
Introduction
Advantages of PHP-FPM
- Memory-efficiency. With mod_php, the full PHP interpreter lives within each Apache child process. Even if an Apache child process only handles requests for static resources (such a PNG or JPEG files) during its entire lifetime, it still carries around that fat PHP interpreter.
- Event MPM. Because PHP is not thread-safe, the use of mod_php requires that Apache use the Prefork MPM . This creates a new apache child process for each request. PHP-FPM allows Apache to operate with the modern, efficient Event MPM, where each worker needs only a lightweight thread.
- PHP User. With mod_php, PHP runs as the apache www-data user. This has been the source of endless file ownership/permission tickets, because typically the document root is owned by some user other than apache or www-data so PHP can’t write to it. PHP-FPM allows us to explicitly choose the user and group that PHP runs under for each individual website.
- Increased Security. With mod_php, it is common to let the apache or www-data user have write access to multiple sites. But if one of them gets compromised, the exploit can easily spill over into other websites. When PHP-FPM is configured to run as a different user/group for each site, and standard document root permissions are in use, PHP-FPM processes for one website won’t have permission to make changes to unrelated websites.
- Fine-grained Tuning. You can set unique limits for each PHP-FPM pool, giving more resources to sites that are busier or more important.
- Independent Scaling. For a busy site, you can have a web server tier and a PHP-FPM tier, each consisting of multiple servers, and scale these tiers separately.
PHP-FPM Pools
PHP-FPM’s architecture involves a parent process, running as root, that spins up “pools” of child processes. To illustrate, here is pools ps output with 2
# ps auxf | grep [f]pm
root 2404 0.0 0.8 232464 8568 ? Ss 11:28 0:00 php-fpm: master process (/etc/php-fpm.conf)
site1 2405 0.0 0.3 232440 3876 ? S 11:28 0:00 \_ php-fpm: pool site1
site2 2406 0.0 0.3 232440 3876 ? S 11:28 0:00 \_ php-fpm: pool site2
Note that each pool runs under a different system user. In fact, when configuring pools, we have full control over many important items, including:
- The system user and group the pool runs under.
- Limits on how many child processes each pool can spin up.
- PHP configuration settings (we can set php_flag and php_value items independently for each pool).
TCP Sockets vs. Unix Sockets
Obviously, since PHP-FPM and the web server are running as independent processes, they need some method for interprocess communication. The web server needs to send requests to PHP-FPM, and PHP-FPM needs to send responses back to the web server. There are actually two approaches:
- TCP Socket. This approach sets up PHP-FPM processes to listen on TCP ports (9000 is the default port, and we commonly use 9001, 9002, etc. for additional PHP-FPM pools). The web server then communicates with PHP-FPM over those ports. This is the default approach taken by most PHP-FPM packages, The only situations where this approach makes sense is when the web server and PHP-FPM are running on different servers, or on different containers within the same server.
- Unix Socket. This approach sends all communication through a unix socket, typically located at a place like
/run/php-fpm/pool-name.sock It is more efficient than communicating via a TCP socket when the web server and PHP-FPM are running on the same server, which is almost always the case in our setups.
Installation and Setup
.
Starting with PHP 7.0, IUS offers a meta-package called phpXX-fpm-httpd that provides a quick working setup of PHP-FPM and Apache. Just yum install php74-fpm-httpd, start and enable the php-fpm and httpd services, and you’ll be up and running. RHEL 8 sets up essentially the same situation when you dnf install php-fpm httpd . Ubuntu and Debian do a similar thing when you apt install apache2 php-fpm ; a2enconf phpXX-fpm. In all cases, you get a default, non-optimized setup that doesn’t incorporate our best practices. As discussed below, you should still work through the following steps for a manual install to make sure Apache and PHP-FPM are configured sensibly and efficiently.
Step 1 – Install Packages
The following instructions are a bit generic; of course you’ll want to choose the right PHP version via IUS on EL 7,8 enable the right PHP module on EL8 , etc.
# EL 7
yum install httpd php-fpm
# EL 7 / IUS
yum install httpd phpXX-fpm phpXX-fpm-httpd
# EL 8/9
dnf install httpd php-fpm
# Ubuntu 18/20/22, Debian 10/11
apt update ; apt install apache2 php-fpm
Step 2 – Configure PHP-FPM
Decide what Pools You Need
Consider what approach to pools this setup needs:
- One pool per VirtualHost? This is our normal approach; don’t deviate from it without strong reasons.
- Default pool? On all package installs, you’ll get a pool named “www” that runs under the apache/www-data user, and which can be used as a default pool. If you configure other pools (as is our normal practice) and explicitly connect all virtual hosts to these other pools, then you won’t need to use the default pool at all. But the below instructions will configure it efficiently and leave it in place to be used by any sites that are not explicitly connected to another pool.
- Multiple pools for some sites? While rare, some sites benefit from multiple PHP-FPM pools. We sometimes do this for Magento, configuring one pool for admin requests, and another for customer requests. A similar situation can occur for sites where you have both a blog and a store or a blog and a forum, etc. The motivation is that you can configure different resource limits and PHP settings for these various pools, in keeping with the needs of the different applications or user tasks.
Configure the Default Pool
First find and CD to the directory where PHP-FPM pools are configured:
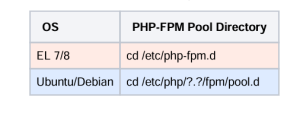
After installing PHP-FPM, this directory will have a single file, www.conf. This is a template for your “default” pool. It is a long file, with copious comments and lots of default settings.
Copy this file to www.conf.original. This preserves the packaged file so we can easily refer to its comments.
Create a simple www.conf. Ideally, this will be configured so that it uses no resources unless virtual hosts use it. To accomplish this, use ondemand the process manager with a small pm.max_children. Any site that needs a more elaborate configuration should really have its n own pool explicitly defined.
Configure Custom Pools
There are three available for PHP-FPM pools. The two that make most sense in our setups are and :
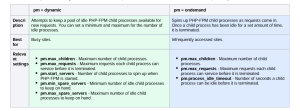
Note when using pm = dynamic
PHP-FPM child processes allocate more memory as needed, but never free memory. So child processes that have been running a long time can become very fat; they will hold onto as much memory as was needed to service their most memory-intensive request. Two of these settings can have a huge impact on memory usage by making sure child processes are regularly recycled and don’t live too long:
- pm.max_requests
- pm.max_spare_servers
Package default values are very inefficient for these two settings, and often lead to memory exhaustion tickets. So be sure to set these values manually
Here are sensible example settings for each process manager (of course you will want to customize these further):
pm = dynamic
[busysite]
listen = /run/php-fpm/$pool.sock
listen.owner = $pool
listen.group = www-data ; Set to the user the webserver runs as: apache/nginx/www-data
listen.mode = 0660
user = $pool
group = $pool
pm = dynamic
pm.max_children = 25
pm.start_servers = 2
pm.min_spare_servers = 2
pm.max_spare_servers = 10
pm.max_requests = 500
php_admin_value[error_log] = /var/log/php-fpm-pools/$pool/error.log
pm = ondemand
[smallsite]
listen = /run/php-fpm/$pool.sock
listen.owner = $pool
listen.group = www-data ; Set to the user the webserver runs as: apache/nginx/www-data
listen.mode = 0660
user = $pool
group = $pool
pm = ondemand
pm.max_children = 10
pm.max_requests = 20
pm.process_idle_timeout = 10s
php_admin_value[error_log] = /var/log/php-fpm-pools/$pool/error.log
Note two things about the pool name (which is on the first line, in square brackets):
- Each pool needs a unique name.
- You can reference the name later in the config via . $poolSo it’s convenient to use the username or domain name as pool name. We strongly encourage that each PHP-FPM pool run with a unique user account and the user account be used for the pool name.
Configure Logging Directories
If you look at the above sample pool configurations you’ll notice this line:
php_admin_value[error_log] = /var/log/php-fpm-pools/$pool/error.log
Remember that PHP-FPM pools run PHP under a custom user. So we’ll need to write their error logs in a directory where the custom user has write permission. This rules out directories like ,/var/log/php-fpm/var/log/httpd and /var/log/nginx ,, because these directories are owned by system users like root and php-fpm. Even if you change directory ownership and permissions, they will be reset on package updates. One common solution is to
just make a set of directories for these logs. This involves two steps:
1. Create the pool directories. If your pool names are usernames, then you can do something like:
for u in user1 user2 user3 ; do mkdir -p /var/log/php-fpm-pools/$u ; chown $u: /var/log/php-fpm-pools
/$u ; done
2. Add logs from php-fpm-pools to the PHP-FPM log rotation config.
/etc/logrotate.d/php-fpm
/var/log/php-fpm-pools/*/*log
# In Ubuntu and Debian this next line will look like “/var/log/php?.?-fpm/*log {”
/var/log/php-fpm/*log {
missingok
notifempty
sharedscripts
delaycompress
postrotate
/bin/kill -SIGUSR1 `cat /run/php-fpm/php-fpm.pid 2>/dev/null` 2>/dev/null || true
endscript
}
Start and Enable PHP-FPM
After starting PHP-FPM, you should see a socket file for each pool you’ve created:
# EL with two sites
systemctl enable php-fpm –now
ls -lh /run/php-fpm
total 4.0K-rw-r–r–. 1 root root 4 Feb 8 15:29 php-fpm.pid
srw-rw—-. 1 site1 apache 0 Feb 8 15:29 site1.sock
srw-rw—-. 1 site2 apache 0 Feb 8 15:29 site2.sock
# Ubuntu 20.04 with default site only
systemctl enable php7.4-fpm –now
ls -lh /run/php
total 4.0K
srw-rw—- 1 www-data www-data 0 Feb 8 15:37 php-fpm.sock-rw-r–r– 1 root root 6 Feb 8 15:37 php7.4-fpm.pid
Step 3 – Configure Apache
Config Needed for Default Pool
The default PHP-FPM pool needs some configuration outside of any virtual host that instructs Apache to send PHP requests to the default pool. This will cause any virtual host that lacks explicit configuration for connecting to PHP-FPM to use the default pool. Newer OS’es are all setting this up by default. Here are OS-specific instructions:
If PHP 7.0 or later has been installed via IUS, then make sure to install the php7x-fpm-httpd /etc/httpd package. This creates a configuration file at /etc/httpd/conf.d/php.conf which connects Apache to the default pool. Alternatively, this configuration file can be created manually; here are the relevant parts of its contents:
/etc/httpd/conf.d/php.conf
#
# The following lines prevent .user.ini files from being viewed by Web clients.
#
<Files “.user.ini”>
Require all denied
</Files>
#
# Allow php to handle Multiviews
#
AddType text/html .php
#
# Add index.php to the list of files that will be served as directory
# indexes.
#
DirectoryIndex index.php
#
# Redirect to local php-fpm (no mod_php in default configuration)
#
<IfModule !mod_php5.c>
<IfModule !mod_php7.c>
# Enable http authorization headers
SetEnvIfNoCase ^Authorization$ “(.+)” HTTP_AUTHORIZATION=$1
<FilesMatch \.(php|phar)$>
SetHandler “proxy:unix:/run/php-fpm/www.sock|fcgi://localhost”
</FilesMatch>
</IfModule>
</IfModule>
The php-fpm package install creates an Apache configuration file at/etc/httpd/conf.d/php.conf . This connects Apache to the default pool; nothing further is needed.
The php-fpm package install creates an Apache configuration file at/etc/apache2/conf-available/php?.?-fpm.conf . Simply enable this config and the FastCGI proxy, and the default pool is ready to go:
a2enconf php?.?-fpm # Replace ?.? by the version #, e.g., 7.4 or 8.1.
a2enmod proxy_fcgi
systemctl restart apache2
Virtual Host Configuration
As discussed earlier, we typically create one PHP-FPM pool per virtual host, and explicitly connect each virtual host to its associated pool. This is best accomplished in a virtual host via aFilesMatch statement referencing the correct socket.
<FilesMatch \.php$>
SetHandler “proxy:unix:/run/php-fpm/poolname.sock|fcgi://localhost”
</FilesMatch>
Configure Apache to use the Event MPM (EL 7)
If a server is using PHP-FPM exclusively, then Apache can use the efficient ( ). The The Event Event MPMhere is (here is some background on Apache MPM’s) MPM is default on all supported OS’es except EL 7. To enable it there, simply edit /etc/httpd/conf.modules.d/00-mpm.conf and make sure only the Event module is loaded:
# Select the MPM module which should be used by uncommenting exactly
# one of the following LoadModule lines:
# prefork MPM: Implements a non-threaded, pre-forking web server
# See: http://httpd.apache.org/docs/2.4/mod/prefork.html
#LoadModule mpm_prefork_module modules/mod_mpm_prefork.so
# worker MPM: Multi-Processing Module implementing a hybrid
# multi-threaded multi-process web server
# See: http://httpd.apache.org/docs/2.4/mod/worker.html
#
#LoadModule mpm_worker_module modules/mod_mpm_worker.so
# event MPM: A variant of the worker MPM with the goal of consuming
# threads only for connections with active processing
# See: http://httpd.apache.org/docs/2.4/mod/event.html
#
LoadModule mpm_event_module modules/mod_mpm_event.so
Start and Enable Apache
Just a few little things left:
# EL 7/8/9 – Need to start and enable Apache
systemctl enable httpd –now
# Ubuntu and Debian – Need to enable the FastCGI Proxy
a2enmod proxy_fcgi
systemctl restart apache2
Converting from Mod_php to PHP-FPM
Proceed Carefully
It can be disruptive to convert a live server from mod_php to PHP-FPM. The conversion needs to be evaluated and planned carefully. Depending on complexity and the customer’s tolerance of downtime, this may need to be done during a maintenance window or even as part of a server migration.
Conversion Steps
The following is a complete and methodical conversion process, but you may wish to adapt it for your specific situation.
Step 1 – Investigate the Server
This is probably the most important step. Here are some questions you need to answer:
- What pools are needed? Identify any busy sites; these should each have their own PHP-FPM pool using the dynamic
process manager Servers with a lot of small sites can get very tedious to convert to PHP-FPM. You probably want to use the ondemand process manager for them. Since they are already expecting to run PHP as the Apache user (apache www-data), it might be practical to just set them up to use the default pool or some other shared pool that runs under the Apache user. Also think about memory limits. If the server has been running properly with MaxRequestWorkers of 200, don’t create 10 pools with pm.max_children of 50 each. - Are there PHP settings in .htaccess files? It is common to use php_flag php_value php_admin_flag, and php_admin_value statements in .htaccess files. Once you run a site under PHP-FPM, these will no longer work. In fact, any attempt to load them will result in a 500 error. So you need to find all of these and move them to the PHP-FPM pool configuration for this site. Typically, any site that was relying on PHP settings in .htaccess should have its own pool. You can use a search like the following to find these:
find /var/www/vhosts -name .htaccess -exec grep php_ {} \;
To put them into the PHP-FPM pool for this site, use syntax like the following:
php_admin_value[sendmail_path] = /usr/sbin/sendmail -t -i -f me@mydomain.com
php_flag[display_errors] = off
php_admin_value[error_log] = /var/log/php-fpm-pools/$pool/error.log
php_admin_flag[log_errors] = on
php_admin_value[memory_limit] = 256M
- What are the document root permissions/ownership? Servers that have been using mod_php for a long time often have ugly workarounds such as 777 permissions, Apache user ownership, or FACL’s. The move to PHP-FPM is a chance to get rid of these.
- What is the conversion schedule? Many customers will prefer to convert sites one at a time so they can test (this is the approach that will be followed below). Others may want to convert the entire server at once. It is also possible to leave some sites on mod_php while having others use PHP-FPM (though that’s not an ideal approach). Discuss options with the customer and find a solution that works best for their needs and concerns.
Step 2 – Install PHP-FPM and Create Pools
Once you know what pools you need, you can go ahead and install the PHP-FPM package, configure all the pools (including the default pool), and make sure all the socket files are there, etc. Also make sure you’ve put any php_flag, php_value, etc. you found in .htaccess files into the pool configs. Then go ahead and start/enable PHP-FPM.
At this point, the server is still 100% using mod_php, but you have all the machinery in place to connect virtual hosts to PHP-FPM pools.
Step 3 – Connect Virtual Hosts to PHP-FPM Pools
If you’re using Ubuntu/Debian, remember to enable the FastCGI Proxy module, as it isn’t enabled by default:
a2enmod proxy_fcgi
systemctl restart apache2
To get a virtual host to start using PHP-FPM, just add the
FilesMatch
config to that virtual host and reload Apache:
<FilesMatch \.php$>
SetHandler “proxy:unix:/run/php-fpm/poolname.sock|fcgi://localhost”
</FilesMatch>
Any virtual hosts that lack this config will still use mod_php.
Step 4 – Fix Document Root Ownership and Permissions
Be careful with this, but once a site is using PHP-FPM, with PHP running under the SFTP user, you have an opportunity to get rid of ugly ownership, permissions, and FACL’s in the site, IF they were put there just to deal with the fact that PHP had to run as the Apache user. In our standard setup, with one pool per site, and PHP running as the SFTP user, all files can be owned by the SFTP user, and normal permissions will work fine (755 for
directories, 644 for files). Apache, of course, still needs read permission to the directories and files, but it typically no longer requires write permission.
Step 5 – Remove mod_php
Before doing this step, make sure you’ve connected all virtual hosts to the correct PHP-FPM pools. Any virtual hosts not connected to a PHP-FPM pool will either:
- Use the default pool (if one has been configured).
- Display PHP source code (if no default pool is configured).
Obviously, that second possibility is disastrous, so double-check that all virtual hosts are ready to have mod_php removed. Instructions are a bit OS dependent:
# EL 7/8
yum remove php
systemctl restart httpd
# EL 7 with PHP 7.x from IUS
yum remove mod_php7*
systemctl restart httpd
# Ubuntu and Debian
apt remove libapache2-mod-php7.?
a2enconf php7.?-fpm
systemctl restart apache2
Note that if you’re relying on some sites using the default PHP-FPM pool, make sure configuration for the default pool is ready before you restart Apache.
Step 6 – Change Apache to the Event MPM
If you made it this far, there’s no reason to use the Prefork MPM, so let’s switch to the Event MPM:
EL – Edit /etc/httpd/conf.modules.d/00-mpm.conf
# Comment Prefork, uncomment Event module
#LoadModule mpm_prefork_module modules/mod_mpm_prefork.so
LoadModule mpm_event_module modules/mod_mpm_event.so
Ubuntu/Debian
a2dismod mpm_prefork
a2enmod mpm_event
systemctl restart apache2
References
https://www.php.net/manual/en/install.fpm.configuration.php
http://httpd.apache.org/docs/current/mod/event.htm